When we try to print fan-expansion tiles on sticky backed paper, then use a light table to paste the images onto Carcassonne blank tiles; we face two possible problems!
- If we print the tile exactly the proper size for the final tile, and we do not place the blank tile exactly on the printed tile, when we then cut off the extra sticky paper with an exacto knife, we end up with some white edges where the blank tile placement was not exact!
- If we print the tile a bit larger so we can avoid any white edges, we are forced to trim off some of the tile’s details at the edges. For example, the coat of arms gets closer to the corner of the tile.
I put on my papa “Geek” hat and came up with a solution to both of these problems. I’m using some of the HTML style features so I can just print the tiles twice - - - on top of each other!
This is an example of one of the fan-expansion Flying Machine 2 tiles. I printed it 3 times so I can explain all of the steps that were taken in my new HTML <style> section.
If you want to print your own copy of this example, there are step by step instructions at the end of this post to help you copy the required files to a directory on your computer.
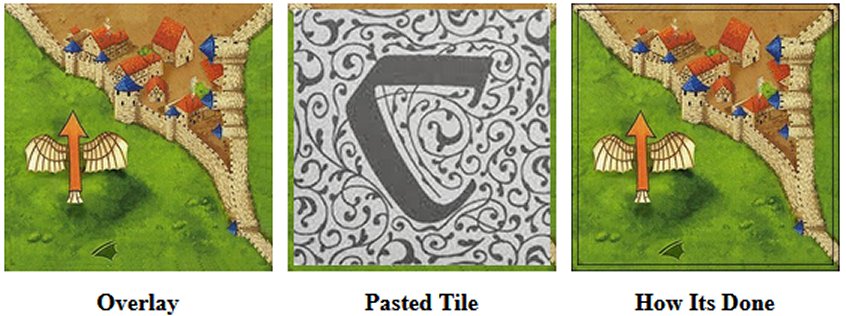
My personal images of the Flying Machine 2 tiles are 314 pixels square. To help illustrate the tile on tile placement, I added a 1 pixel black border around one of those tiles to create the 316 pixel square image for the tile on the right side of this sample.
Using HTML <style> coding I printed each tile twice, on top of each other. The first/bottom image is 179 pixels square and the second/top image is the proper 171 pixels square, the tile that you actually want to cut and paste onto your Carcassonne blank tile. Because of the extra black border, you can see this in the “How Its Done” image as a tile sized box is just barely centered inside a slightly larger box!
The Math: I placed 31 Carcassonne tiles side by side on my desktop and measured them as exactly 55 inches. 55 divided by 31 equals 1.77419 inches for each tile. The standard for displaying on a computer screen is 96 pixels per inch, so a Carcassonne tile should be 55/31*96, 170.323 pixels square! Even the cheapest printers print at a resolution of 600 dots per inch, 1,064 dots per tile! So, the higher the resolution of your copies of your tile images, the better the quality of your printed tiles.
Printing a tile image 171 pixels square would require about one third of a pixel to be trimmed off of each edge of the tile. The 179 pixel magnified image under the final Carcassonne tile stretches the outer border an extra 4 pixels to give you plenty of room to place and trim your blank tile with no white border is your placement isn’t perfect!
This will be the basic HTML coding used to print each tile . . . twice:
<td class=overlay><img class=ot0 src=CFFFv.jpg>
<img class=ct0 src=CFFFv.jpg></td>
Each tile will be an HTML overlay where you print the Oversized Tile, ot0, first, 179 pixels square, then you print the Carcassonne Tile, ct0, 171 pixels square, centered on top of the oversized tile.
Here are the steps to create your own copy of my directory for printing tiles this way:
The first step in creating your own files for creating these tiles is to create an empty directory on your computer, then right click on each of the following 3 images, copy the image, then paste a copy of it into your directory.
The actual Carcassonne Flying Machine tile, CFFFv.jpg, 314 x 314 pixels.
The actual Carcassonne Flying Machine tile, CFFFvp2.jpg, 314 x 314 pixels.
Carcassonne tile back, Blank.jpg, 166 x 166 pixels
The next step is to create a blank notepad file: demo.txt
Read all 4 steps before creating your HTML file
1. This link will display the tiles
www.papageek.com/car/demo/demo.html2. Right click on a white area on the page, then select “View Page Source” from the pop-up menu.
3. Copy all of the source code and paste in into your demo.txt file.
4. Rename demo.txt to demo.html, then double click the file to open it.
I’ve included some basic comments in the style section of the HTML file to explain what is happening. Feel free to ask any questions here on this thread, or you can just PM me.
Linkback: https://www.carcassonnecentral.com/community/index.php?topic=6420.0

 Share Topic


